Showing posts with label 4-H. Show all posts

Saturday, July 6, 2013

4-H Meetings for May and June

The first meeting in May we made goop or slime.  I talked first a bit about the chemistry behind it and then let the kids goof around a bit with their creation.
My 6 year old waters this plant daily
(with not reminders!) and after a few
weeks the flowers are doing quite well.

The second meeting in May the kids and I discussed the reason we have plants and all the great things they do for us from making our planet beautiful to providing oxygen, medicine, food, etc.  Then the idea was to go outside and plant some flowers in pots, but of course it had rained here in Fargo almost everyday for the past 3 weeks and we were stuck inside.  Well, I had visions of mud and dirt all over the floor and tables, but other than a bit of spilled dirt here and there my worst fears never came true.  We've had worse messes in our club - a volcano a few years ago comes to mind.

With school being done we no longer have a place to hold our meetings and so for the first meeting in June we went to a local potter store, Clay Your Way, and had the kids decorate a clay bowl, mug or plate.

Our last meeting in June we went to a local nursing home and after a brief tour the children played bingo with some of the residents.  The children really enjoyed themselves and afterwards we went to a local park and had a picnic.

July is the Red River Valley Fair and many members of the club will be participating by entering their projects.  Also, we will be manning the 4-H food booth.  The fair is the highlight of the 4-H year!

Tuesday, April 16, 2013

4-H Mother's Day Projects: Cards and Bird's Nest Necklace

For our first meeting in April the children made cards to give to their moms, grandmothers or aunts for Mother's Day.  I wasn't there to take any pictures and I am not allowed to look at the cards my own children made - I may getting one or two for Mother's Day!

For our second meeting this month I had the children make bird's nest necklaces.  I had seen them on various websites on line and they are quite simple to make and they always seem to look great no matter what age makes them.

First, the children picked out the same number of beads as the number of children the mother had for whom they were making the necklace.  They then strung them on a wire and began wrapping the wire around the beads to create the look of a nest.  When almost out of wire they attached it by wrapping the wire around itself and then made a loop for the chain.  Lastly they had to attach the hook to the chain.  

Now the children have a card and a gift to give to someone they love on Mother's Day.


I think all the necklaces are so unique and quite beautiful and I know the recipients of the necklaces will be proud to where them.


Saturday, March 30, 2013

Owl Pellets

Last month (yes, I know I am behind in my posts for 4-H:  please forgive me) I had the kids dissect owl pellets.  Yep, I had the whole club taking apart the regurgitated pellets to see what the owl ate. Even the Cloverbuds did this project.  Only one child didn't want to do it, but the rest dove right in and, if not enjoyed themselves, at least didn't complain - not to me anyway.  Actually, a few of the kids were quite intrigued and even took their pellet home to continue digging around the fur and bones to see what had been eaten.  I love this project as our local 4-H organization supplies the pellets, gloves, tweezers and information that I need.  I didn't take any pictures as really who wants to look at something that resembles what your dog left you in the back yard?  But I would recommend doing this for a club project or even at home if your children love learning about animals.  I had my oldest dissect an owl pellet a few years ago and purchased it from Hometrainingtools.com along with some other science supplies I needed for school that year.

Tuesday, February 26, 2013

4-H Decorating Cakes

I am late getting this out, but as they say "Better late than never." For our last meeting one of the parents, who does an amazing job decorating cakes, came in and taught the kids some cake decorating skills.

First, she showed the kids how to frost the cakes and the different techniques to decorate them.  She also brought along some pictures of her "artwork".

Then she had the kids practice on sheets of laminated paper.


After practicing, the fun began: it was time to decorate their own cupcakes.


Tuesday, February 5, 2013

4-H Project - Making a Clock

I can't believe February is already here.  The weeks have flown by, which is good because I am getting a bit tired of the cold and snow.


Our project this meeting was making clocks.  Our club purchased the clock mechanism, but the kids came up with their own ideas and created some amazing clocks.  Some were finished, but many of them still need a bit of work.  Take a look at the creative ideas some of the kids came up with:


The chess pieces will be added to represent the numbers.
The board was too thick to add the clock mechanism, so the 4-H'r will work on it at home.

The 4-H'r stained and varnished the cross.  It turned out beautiful.

This one was also too thick for the clock, but with a bit of work it will turn out amazing.

This one is so simple, but I love it.

The top of the cake is a bit too big.  The 4-H'r told me she will either get larger hands or make the top of the cake smaller. The numbers will be put on the bottom layer.  The sides of the cake were decorated too.  Quite cute.

We have a sports fan.  The board again was too thick, but I this will be a great addition to the kids bedroom when finished.


This clock will be a present for the 4-H'rs father.  They may use the album cover too in the display.  

This one was not finished, but the 4-H'r will also add some cross-stitched flowers for the center.

A cloverbud made this clock.

This is a box that looks similar to a medicine chest which the 4-H'r painted.  The numbers and other embellishments will be added.  

I love the colors for this clock.  It also was too thick and she will work on it at home.


All the kids came up with such great ideas.  I am looking forward to seeing the clocks when they are finished.

Monday, January 14, 2013

4-H: Crackle Paint Project

For our December meetings we finished the leathercraft project by making book marks and our final meeting of 2012 was our Christmas Party and the kids enjoyed themselves by playing some silly games.

For our first meeting in January I thought the children would enjoy crackle painting the edges of a picture frame.  Once dry they would insert a nice piece of scrapbook paper for the background.  These then can be used as "white boards" or memo boards as you can write on the glass with a dry erase marker.

An easy and inexpensive way to crackle the paint is to brush on Elmer's Wood Glue and allow to get tacky and then paint over with the color of your choice.  Easy enough, except we were dealing with extremely dry conditions here in the dead of winter in North Dakota and the glue dried before the children were able to get the paint on the frame.  Because of this most of the frames did not crackle, but the kids still had fun getting a bit messy and I really don't think any cared if their paint crackled or not.  I never heard one word of complaint, so they were either happy with the results or just extremely polite!

To keep the cost down I bought a few of the frames from garage sales over the summer at a quarter a piece and the rest from the dollar store.  I also picked up the paint free at our hazardous waste. The biggest expense was the glue.

In the end the project was fairly inexpensive and the kids really did enjoy themselves.  I have heard back from some parents that their children plan to do this again at home, so I must admit the project was a success.


Wednesday, November 7, 2012

4-H Leathercraft Project for the Month of November

As a 4-H project leader I am grateful to the local extension office for the services they provide.  One of those is the educational trunks.  The trunks cover many categories including agriculture, nature, space, technology and animals to name a few. Included in the trunks are various books and pamphlets on the subject along with the materials needed to complete numerous projects.

The past years I have checked out various trunks.  We used the Astronomy trunk to learn about the planets and stars, and at the end of the meeting the children were able to look through the telescope to view them.  Another trunk I used last year was the Raptor trunk and the older kids dissected an owl pellet.  But I would have to say one of our club's favorite is the Leathercraft trunk.  No matter what age the kids can create a one of a kind work of art.

Here are a few examples from our meeting on Monday:


None of these are great works of art, but the kids are extremely young and just learning.  And what is interesting about this project is no matter what the skill level they all enjoy it.  Next meeting they will work on book marks and I am hopeful they will take the skills learned this past meeting and create some wonderful pieces.  

Tuesday, October 16, 2012

4-H Project: The Phases of the Moon and a Planetarium Made From a Star Chart

We have a great resource provided by the local college and the 4-H council and it is educational trunks . There are quite a few of the educational trunks to use including astronomy, cooking over a campfire, birds, robotics and Legos to name a few. This meeting I wanted to have the kids use the telescope from the astronomy trunk to look at the stars, but the weather did not cooperate and it was too cloudy.  But even with the disappointment we still learned a bit about what is out there in the universe.

 -
http://www.starpath.com
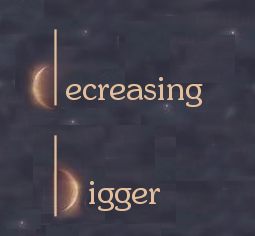
My oldest gave a speech on the Moon and this included how to tell if the moon is waxing or waning.  To do this imagine a lower case "b" or "d" covering the moon.  If the "b" is covering some white then the moon is being born or getting bigger  (waxing) and if the "d" is covering the white then the moon is dying or it is decreasing in size (waning).


http://www.sciencebob.com


Then the Cloverbuds made the phases of the moon by using Oreos.


For the older kids we first discussed some facts about stars and learned how to find the north star (Polaris).
http://earthsky.org/

Next, I had them take a copy of a star chart, paste it to some poster board and then using a thumb-tac and a nail I had them poke holes through the stars on the star chart.  This took quite a bit of time and the kids will need to finish the rest of the project at home.  When they get home they need to take a box and cut out a hole for the star chart, insert the chart in backwards and make another hole at the other end of the box to put a flashlight through. When the kids take their small planetarium into a dark room and shine the light through the poked out holes they will be able to see the stars on the wall.  (I wanted to provide a link for a star chart, but I can't find a good one.  The chart we used was included in the 4-H Astronomy Trunk.)

Place the star chart so it faces the box.
The light from the flashlight will go
through the holes and shine onto
your walls.


I suggested to the kids they could decorate their box and enter it into the fair.

Friday, October 5, 2012

4-H: Mod Podge Project

Where does the time go?  Fall began, September flew by and October arrived and our 4-H club had its first meeting for the month.  Last spring I had picked up a bunch of old clipboards at a garage sale and I thought it would be fun to decorate them.  This was a fairly simple project using only Mod Podge, scrapbook paper, embellishments such as flowers, stones, gems, sea shells, etc. and a brush.  Also, the project was fairly inexpensive as our parents stepped up and brought a lot of the items we needed.  The most expensive part was the Mod Podge itself at almost $8.00 a bottle.  You can make your own by just watering down school glue (about 1/2 glue to 1/2 water), but add a small amount of water-based varnish to give it the sheen and hardness of Mod Podge.

First, I had the children tie the clip part of the clipboard open so it would not interfere with their work. Next, they brushed on the Mod Podge, attached the paper and brushed on more Mod Podge over the scrapbook paper.  I also suggested to the kids to add a ribbon where the clip came down onto the board to help keep the paper from wearing down.  The really fun part was decorating the clip of the clipboard.  I did mine quite simply, but many of the kids added quite a few items to theirs.

This wasn't a hard project, but it was fun for the children and the finished product did turn out quite nice.

Saturday, September 29, 2012

4-H: Microwave Cake

For our second 4-H meeting I decided to talk to the kids about the basic ingredients that make up a cake as one of the kids wanted to learn about baking.  The only problem I had was our room does not have an oven, and since I always want to have a finished product for the kids I decided we would use coffee mugs and microwave individual cakes for each child.  We learned a bit about baking, but I am sure the best part for our club was the mini cakes with the surprise center (we added a small candy bar).  I have a link to my notes on cake ingredients and their purpose if you want to take a look.
Baking Project

To make the cakes I just mixed up a boxed cake mix according to directions, spooned in enough batter so the mug was about 1/2 full, added a mini candy bar and microwaved almost 2 min. Another option for those at home is to take a cake mix and an angel food cake mix and combine them.  Then when you need a bit of sugary goodness, but don't want to bake a whole cake (and worse eat a whole cake!), take 3 T of the mix and add 2 T water and microwave for 1-2 minutes.

As usual with most of our 4-H projects I actually learned something as I never really knew what double acting baking powder was and how it worked.

I don't have a picture for you, but to be honest the finished cakes were not "pretty".  The mini-cakes did taste good, though they are a bit more "spongy" compare to an oven baked cake.  Enjoy!


Wednesday, September 5, 2012

First 4-H Meeting

So I haven't posted anything in quite a few days.  With the long Labor Day weekend, relatives visiting and just life I let my little blog slide to the back burner.  Now that it is the middle of the week and life has settled back into a semi-normal routine I thought I would write about 4-H.  I help run a club here in town and my main job is to lead our projects.  We meet twice a month and I thought I would post what we do for a project at each meeting so that other leaders and 4-H'rs can get ideas for their projects.  Our goal for our club is to have the children work on a project that they can ultimately enter into the county fair.  I also make sure the project is educational.  One hard part is to get a project done in the short amount of time we have at our meeting and so sometimes I have a project that takes more than one meeting to complete or the kids have to complete the project at home.

For our first meeting this week I had no idea how many kids would show up and so my project had to cover 10 to possibly 30 kids.  I had the children bring a t-shirt to decorate.  I then had them use permanent markers (Sharpies) to decorate the shirts.  They could draw pictures, write their names, or just draw random designs.  Once they did this I then had them pour rubbing alcohol over the design they made with the markers.  (Just be careful that the alcohol does not get on the back of the shirt as the dye of the marker will bleed into the back.)  When done, air dry and then set with an iron.

I think this could be a very artsy project with an older child.  If one controlled the rubbing alcohol better by only letting it run one direction, or using an eye dropper, etc. the results could be amazing!  Hope this gives you an idea for your 4-H project or just something to do with the kids around the house.

By the way, this could fall under the category "Decorate your duds" or even "Item for your room" if you decorated a pillow case or something.